Discharge Instructions: Giving Yourself an Intramuscular (IM) Injection in the Thigh
Discharge Instructions: Giving Yourself an Intramuscular (IM) Injection in the Thigh
You were shown how to perform an IM injection in the hospital. If you did not get an instruction sheet covering those general steps, ask for one. This sheet reminds you or your caregiver how to give an IM injection in the thigh area.
Name of your medicine:
_________________________________.
Amount per injection:
_________________________________.
Times per day:
_________________________________.
Step 1. Getting ready
Wash your hands thoroughly before and after all IM injections.
Prepare your medicine as you were shown by your healthcare provider.
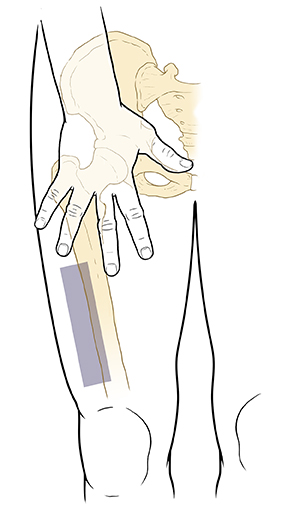
Step 2. Finding an injection site
Think of your thigh as a large rectangle. Once you have found the 4 sides, you may give an IM injection in several spots inside this rectangle.
Place the palm of your hand against the front of your thigh where it meets your groin. (If injecting into your right thigh, use your right hand. If injecting into your left thigh, use your left hand.) The area just below your hand is the top of the rectangle.
Next, place your palm over the top of your knee. The area just above your hand is the bottom of the rectangle.
Now imagine a line going down the middle of the front of your thigh. This is one long side of the rectangle.
Then imagine there is another line along the outside of your thigh. This is the other long side of the rectangle.
Now imagine there is a line down the middle of your rectangle. (This line goes straight down from your groin to your knee.) Anywhere along this line is the best place to give the injection.
Step 3. Injecting the medicine
Prepare the site as you were shown by your healthcare provider. See the general instruction sheet on giving yourself an IM injection. If you did not get this sheet, ask for one.
Stretch the skin tight.
Hold the syringe like a pencil. Insert the needle straight into your skin.
Give no more than 4 mL of medicine in this site. If the prescribed dose is more than 4 mL, you may need to split the medicine into 2 doses. You would then give 2 injections in 2 different sites.
Step 4. Removing the needle
Remove the needle and syringe outward away from the body.
Release the skin.
Step 5. After the injection
Put the needle and syringe in a special container (sharps container).
Dispose of the materials as you were shown by your healthcare provider.
Wash your hands well.
Medicine that comes in a container for a single dose should be used only 1 time. If you use it a second time, it may have germs that can cause infections. These infections usually affect the skin and soft tissues. But some infections can affect the brain, spinal cord, or heart. Sharing another person's used needles or medicines can cause other infections such as hepatitis B and hepatitis C.
Follow-up care
Follow up with your healthcare provider, or as advised.
When to seek medical care
Call your healthcare provider right away if you have any of the following:
Problems that keep you from giving yourself the injection
Needle that breaks off in the injection site
Medicine injected into the wrong area
Bleeding at the injection site that won’t stop
Severe pain, rash, or swelling at the injection site
Shortness of breath
Fever of 100.4°F (38°C) or higher
Chills
Updated:
April 24, 2017
Reviewed By:
Image reviewed by StayWell medical illustration team.,Perez, Eric, MD,Ziegler, Olivia, MS, PA