Your Child’s Nasogastric Tube: A Comprehensive Guide to Care
Your Child’s Nasogastric Tube: A Comprehensive Guide to Care
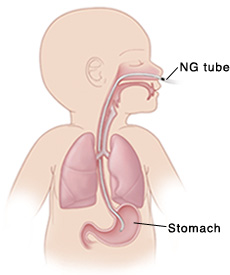
Your child is going home with a nasogastric (NG) feeding tube in place. This is a soft, thin tube inserted through your child’s nose down into his or her stomach. It delivers liquid food directly to the stomach. You were given home care instructions for your child’s tube before he or she was discharged from the hospital. These sheets can help you remember those instructions when you and your child are at home. Arrangements may also be made for a home health nurse to help you.
Note: There are many types of NG tubes, feeding syringes, and pumps. Your child’s NG tube and supplies may look or work differently from what are described and shown here. Always follow the instructions given by your child’s health care provider or home health nurse. Ask them for phone numbers to call if you need help. Also, make sure you have the phone number for your child’s medical supply company. You may need to order more supplies for your child in the future. Write all of these phone numbers below.
Health care provider phone number: ____________________________________
Home health nurse phone number: ____________________________________
Medical supply company phone number: ________________________________
Home care: Placing the tube
Your child’s NG tube needs to be replaced every 14 days. (If your child pulls the tube out before then, you’ll need to reinsert it. It’s okay to use the same tube in this case. Before you reinsert it, wash the tube with soap and water.) Change nostrils each time you need to insert the tube.
Supplies
NG tube
Dark-colored marker pen
Water-based lubricant
Adhesive skin dressing
Tape
5 to10 mL syringe
Steps
Prepare the tube
Wash your hands with soap and water.
One end of the tube is rounded and goes into the nose. The other end has two ports. One port is for feeding. The other port is for giving medications.
The tube may have a wire (metal stylet) inside it. The wire keeps the tube from curling. If your child’s tube has a wire, check that it can be removed easily and doesn’t get stuck.
Measure the tube
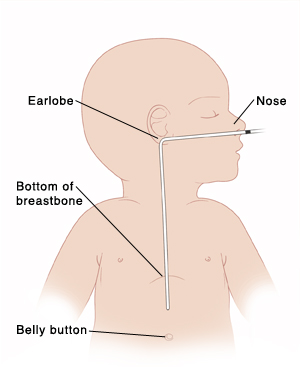
Hold the tip of the tube at your child’s nose.
Extend the tube to the earlobe. Then, extend from the earlobe to a spot between the bottom of the breastbone (xyphoid process) and the belly button.
Keep your finger on the tube at this spot.
Use a dark marker pen to mark this spot on the tube. This shows how much of the tube needs to be inserted before it reaches the stomach.
Position your child
If your child is an infant, wrap him or her in a blanket to prevent movement.
If your child is older, he or she should sit upright. Also, if possible, have your child tuck his or her chin slightly toward the chest.
Insert the tube
You may need someone to hold your child while you insert the tube.
Apply water-based lubricant to the tip of the tube so that it can slide through the nose easily.
Gently guide the tube into either nostril.
The tube is easier to advance when your child is swallowing. An infant can suck on a pacifier as you insert the tube. An older child can drink water or dry swallow. Don’t force the tube. If your child coughs, gags, or has trouble breathing, stop and wait. Allow your child to rest. Then, try again.
Advance the tube until the mark you made earlier reaches the child’s nose.
Place the adhesive skin dressing on your child’s cheek where you plan to tape the tube. This protects your child’s skin from being damaged by the tape.
Tape the tube to your child’s cheek over the adhesive skin dressing (as you were shown in the hospital). This secures the tube in place.
If your child’s tube has a wire, remove it at this time. Don’t throw the wire away. In case you need to reinsert the tube, the wire can be reused to keep the tube straight.
Check the placement of the tube
Attach the syringe to the end of the tube and make sure the other port of the tube is closed off.
Pull back on the plunger of the syringe to get stomach contents.
Check the pH using pH paper. Gastric (or stomach) pH should be 1 to 4 if your child is not on a proton pump inhibitor or H2 receptor antagonist. Please discuss your child's medication with his or her doctor.
Observe the color of the fluid. Gastric (stomach) fluid should look clear, light yellow, or light green.
Disconnect the syringe from the tube.
When the placement of the tube is confirmed, adjust the tape on your child’s cheek to secure the tube in place, if needed.
Wash the syringe with soap and water and let it dry.
Wash your hands with soap and water when you are done.
Tips for parents
Some parents don’t like how the tube looks on the child. But it shouldn’t be uncomfortable for your child. The tube doesn’t hurt and your child will get used to it in time.
When placing the tube, it may help to talk to your child and explain what you’re doing. Praise your child after you have placed the tube.
You’ll need to check the skin around your child’s nose and face regularly to prevent soreness and infection. Keep the area around your child’s nose clean and dry. Also, make sure to cleanse your child’s mouth regularly. Do this even though he or she isn’t taking food by mouth.
Always have a backup tube in case a problem occurs with your child’s tube.
Home care: Checking tube placement before feeding
Every time you feed your child, check to make sure that the NG tube is in the right place. The end of the tube must be in your child’s stomach, NOT in a lung or the throat. Perform this check BEFORE each feeding.
Supplies
5 to 10 mL syringe
Steps
Wash your hands with soap and water.
Check for proper tube placement:
Attach the syringe to the end of the tube and make sure the other port of the tube is closed off.
Pull back on the plunger of the syringe to get stomach contents.
Check the pH using pH paper. Gastric (or stomach) pH should be 1 to 4 if your child is not on a proton pump inhibitor or H2 receptor antagonist. Please discuss your child's medication with his or her doctor.
Observe the color of the fluid. Gastric (stomach) fluid should look clear, light yellow, or light green.
Disconnect the syringe from the tube.
When the placement of the tube is confirmed, adjust the tape on your child’s cheek to secure the tube in place, if needed.
Wash the syringe with soap and water and let it dry.
Proceed with feeding as you have been instructed.
Wash your hands with soap and water when you are done.
Note: If you are NOT SURE the tube is in the stomach, DON'T proceed with the feeding. Reinsert or advance the NG tube as you were instructed by the health care provider and REPEAT the steps the check for CORRECT placement.
Home care: Feeding your child
There are two types of feeding that can be done with an NG tube:
Bolus feeding. A meal-sized amount of liquid food is given through the tube several times a day. Bolus feeding is given using a syringe or a pump.
Continuous feeding. Liquid food is dripped slowly through the tube. Continuous feeding is given using a pump.
Your child may be prescribed one or both types of feeding. Detailed instructions for each type of feeding are given below.
Bolus feeding using a syringe
Your child’s health care provider or home health nurse will tell you how much liquid food to use for each bolus feeding. You’ll also be told how often to feed your child every day. Write these numbers below:
How much to give at each feeding: _________________________
How often to feed: __________________________
Supplies
NG tube
Liquid food
Feeding syringe
Steps
Wash your hands with soap and water.
Check the placement of the tube to confirm that it’s in the stomach (as you were shown in the hospital). Always do this BEFORE starting a feeding.
Check the label and expiration date of the liquid food. Don’t use any can (or bag) if the expiration date has passed. Instead, get a new can (or bag).
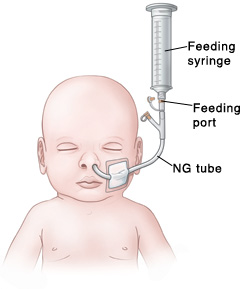
Open the feeding port cap at the end of the tube.
Pull the plunger out of the feeding syringe.
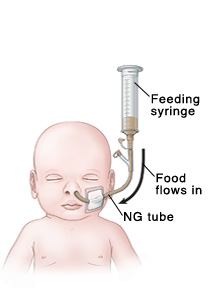
Connect the feeding syringe to the feeding port of the tube.
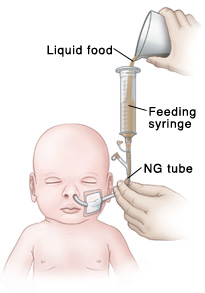
Gently bend or pinch the tube with one hand. Keep bending or pinching the tube as you slowly pour the food into the feeding syringe with your other hand. This keeps the food from flowing through the tube until you have finished measuring it.
Fill the feeding syringe only to the amount that was prescribed by your child’s health care provider.
Release the hand that is bending or pinching the tube.
Hold the feeding syringe straight up. This allows the food to run through the tube by gravity. Adjust the angle of the feeding syringe to control the flow rate of the food.
If the food flows too slowly or doesn’t flow at all, place the plunger in the syringe. Gently, push the plunger a bit. This can help remove anything that is blocking or clogging the tube. Do not push the plunger all the way into the syringe or with force.
Refill the feeding syringe with food, if needed. Repeat steps until your child has received the prescribed amount of food.
After the feeding, flush the tube with water (as you were shown in the hospital).
Disconnect the feeding syringe.
Close the feeding port cap of the tube.
Wash your hands with soap and water when you are done.
Additional instructions: ______________________________________________________________________
__________________________________________________________________________________________
__________________________________________________________________________________________
__________________________________________________________________________________________
Bolus feeding or continuous feeding using a pump
For bolus feeding, your child’s health care provider or home health nurse will tell you how much liquid food to use for each feeding. You’ll also be told how often to feed your child every day. Write these numbers below:
How much to give at each feeding: _____________
How often to feed: __________________________
For continuous feeding, the amount of food to be given and time frame are often set on the pump for you. Do not change pump settings unless you’re instructed to do so.
Supplies
NG tube
Liquid food
Clean feeding bag with tubing
Feeding pump
5 to10 mL syringe (for flushing)
Water (for flushing)
Steps
Wash your hands with soap and water.
Make sure the pump is in the STOP/OFF mode.
Check the placement of the tube to confirm that it’s in the stomach (as you were shown in the hospital). Always do this BEFORE starting a feeding.
Check the label and expiration date of the liquid food. Don’t use any can (or bag) if the expiration date has passed. Instead, get a new can (or bag).
Make sure the clamp on the feeding bag tubing is closed.
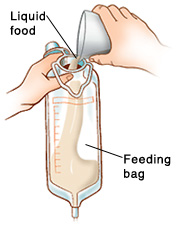
Pour a little more than the prescribed amount of liquid food into the feeding bag. Close the top of the bag.
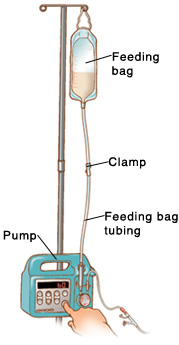
Hang the feeding bag on the pole above the pump. Make sure the feeding bag tubing hangs straight.
Open the clamp on the feeding bag tubing slowly. Let a small amount of food run through the end of the feeding bag tubing. This clears air out of the feeding bag tubing. It also helps keep your child from having gas later.
Load the feeding bag tubing into the pump.
Close the clamp on the feeding bag tubing.
Open the feeding port cap at the end of the NG tube.
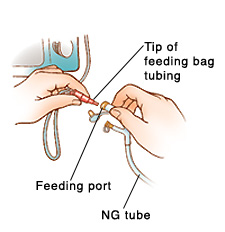
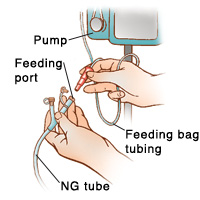
Connect the feeding bag tubing to the feeding port of the NG tube.
Open the clamp on the feeding bag tubing.
Check that the settings on the pump are correct.
Turn the pump to START/ON.
After the feeding, flush the tube with water (as you were shown in the hospital).
Disconnect the syringe from the NG tube.
Close the feeding port cap of the NG tube.
Wash your hands with soap and water when you are done.
Additional instructions: ______________________________________________________________________
__________________________________________________________________________________________
__________________________________________________________________________________________
__________________________________________________________________________________________
Home care: Flushing the tube
One of the things you must do is flush your child’s tube regularly to keep it from getting clogged. Detailed instructions are given below.
Flushing the tube for bolus feeding using a syringe
Flush your child’s NG tube after each feeding or as instructed by your child’s health care provider or home health nurse.
Supplies
Feeding syringe
Water
Steps
Wash your hands with soap and water.
The feeding syringe should already be connected to the NG tube.
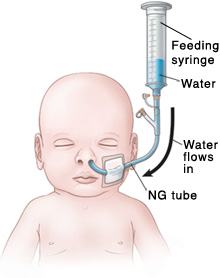
Pour water into the syringe. Let it run through the NG tube by gravity.
If the water flows too slowly or doesn’t flow at all, place the plunger in the syringe. Gently, push the plunger a bit. This can help remove anything that is blocking or clogging the NG tube. Do not push the plunger all the way into the syringe or with force. Changing the child’s position so that he or she is lying down or sitting upright may also improve the flow.
Disconnect the syringe from the NG tube when the flushing is complete.
Close the feeding port cap of the NG tube.
Wash your hands with soap and water when you are done.
Additional instructions: ______________________________________________________________________
__________________________________________________________________________________________
__________________________________________________________________________________________
__________________________________________________________________________________________
Flushing the tube for bolus feeding or continuous feeding using a pump
Flush your child’s NG tube after each bolus feeding, or as instructed by your child’s health care provider or home health nurse. With continuous feeding, you may only need to flush the tube after the last daily feeding.
Supplies
5 to10 ml syringe
Water
Steps
Wash your hands with soap and water.
Make sure the pump is in the STOP/OFF mode.
Make sure the clamp on the feeding bag tubing is closed.
Disconnect the feeding bag tubing from the NG tube.
Put the tip of the empty syringe in water.
Draw up 5 to10 mL of water.
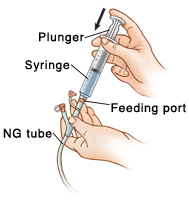
Connect the syringe to the feeding port of the NG tube.
Gently push the plunger all the way into the syringe.
Disconnect the syringe from the NG tube when the flushing is complete.
Close the feeding port cap of the NG tube.
Wash your hands with soap and water when you are done.
Additional instructions: ______________________________________________________________________
__________________________________________________________________________________________
__________________________________________________________________________________________
__________________________________________________________________________________________
When to seek medical care
Call the doctor right away if any of the following occurs:
You’re unable to place the tube.
Your child has trouble breathing.
Redness, swelling, leakage, sores, or pus develops in the skin around the tube site.
You see blood around the tube, in child’s stool, or in contents of the stomach.
Your child coughs, chokes, or vomits while feeding.
Your child has a bloated or rigid abdomen (belly feels hard when gently pressed).
Your child has diarrhea or constipation.
Fever:
In an infant under 3 months old, a rectal temperature of 100.4°F (38.0°C) or higher
In a child 3 to 36 months, a rectal temperature of 102.0°F (39.0°C) or higher
In a child of any age who repeatedly has a temperature of 104.0°F (40.0°C) or higher
A fever that lasts more than 24 hours in a child under 2 years old, or for 3 days in a child 2 years or older
Seizure caused by the fever
Updated:
March 21, 2017
Reviewed By:
Bass, Pat F. III, MD, MPH,MMI board-certified, academically affiliated clinician
