Flushing an IV Catheter
Flushing an IV Catheter
Flush your IV catheter as directed by your healthcare provider. Below is a general guide. The exact flush method you use will depend on the type and size of your catheter, your medicine schedule, and your provider's policies and procedures. Also, IV flush methods for infants and children will be different than those for adults.
Flush your IV catheter after each use. Or flush it once a day if not in use. Some catheters need only weekly flushing if not in use. Check with your healthcare provider. You will be told how much flush solution to use. Usually, the flush solution is normal saline. This is a sterile solution of salt and water. If instructed, also flush with a heparin solution after the second saline flushing. The heparin solution helps keep the catheter from clotting.
Fill syringe |
Remove air |
Wipe |
Inject |
Finish |

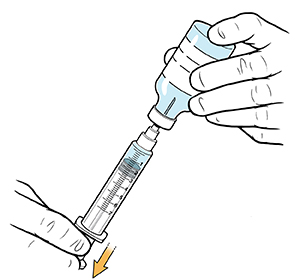
Step 1. Fill a syringe—if you are not using a prefilled syringe
First clean your hands with soap and running warm water. Or use an alcohol-based hand rub or gel.
Uncap a new bottle of the prescribed flush. If the bottle is already open, clean the rubber stopper with an alcohol pad. Or clean it with an antimicrobial or antiseptic swab.
Pull the syringe plunger back up to the amount of saline or heparin you need, filling the syringe with that amount of air. Uncap the needle or needle-free device and put it into the stopper. Push the plunger in all the way.
Turn the bottle upside down, pull back on the plunger and withdraw the prescribed amount of solution. Typically, the amount is 3 cc (cubic centimeters). But the amount will depend on your specific situation.
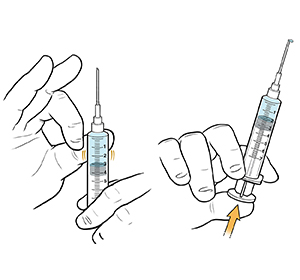
Step 2. Remove air from the syringe
Hold the syringe with the needle or needle-free device pointing up. Flick or tap the syringe. Any large air bubbles should rise to the top.
Slowly push in the plunger until a tiny drop of saline or heparin comes out of the needle. This means you’ve gotten all the air out. Replace the cap of the needle or needle-free device. That way the needle or needle-free device will still be sterile when you put it down.
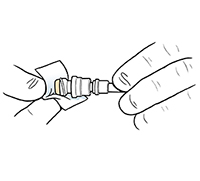
Step 3. Wipe the port
Wipe the port with an alcohol pad. This reduces the risk of germs entering the IV line.
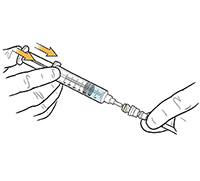
Step 4. Inject saline or heparin
Open the catheter clamp. Uncap the needle or the needle-free device. Insert it into the injection port.
Flush the catheter. Push the plunger in slowly and smoothly. Do not force it.
Step 5. Finish flushing
Close the catheter clamp just before the syringe becomes empty. This stops blood from flowing back into the catheter. (Some catheters may not need clamps.)
Remove the needle or needle-free device and syringe from the injection port.
Place the used items in a sharps box.
When to seek medical care
Call your healthcare provider if you experience any of the following near the injection site:
Redness
Swelling
Soreness
Drainage
Pain while flushing
Updated:
April 16, 2017
Sources:
Lippincott, Williams, Wilkins. Lippincott's Nursing Procedures. 2009 (5th): 360-372.
Reviewed By:
Image reviewed by StayWell medical illustration team.,Mancini, Mary, MD,Ziegler, Olivia, MS, PA